Categories
Maths for Teaching slow build

Factor(is)ing

Spot the difference! Which wording are you used to and why?

Asking “What is Factorising?”

The majority of the time, when I hear this question asked in class I have heard the word “Brackets” come up in the response. As a teacher when I hear this answer I generally take it as correct – The student has clearly remembered part of the method behind factorising and is stating a key symbol they use during that process. But there would usually be silence when I asked how factorising related to its root – Factors. What are the factors of 3x+3 – why does it feel strange to describe (x+1) as a factor?

Using a Factor Tree to Practise Factorising

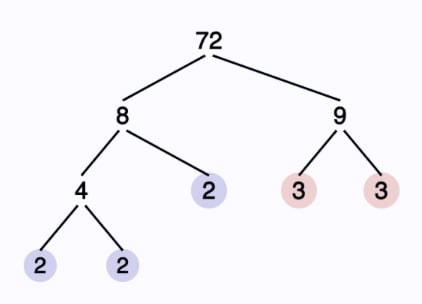
When students are taught to write numbers as the product of their prime factors we tend to use a “tree” to split the numbers (As shown below)

Example of Prime Factor Tree with Prime Numbers circled

I decided to see if I could use this same method to practise students ability to factor expressions as well and then create a link between what you are doing in both case – Splitting something into a product of their factors.

So I made a worksheet and gave it to my students to see what they would make of it. As the sheet contains a lot of structure I let them initially work through it in pairs and without giving them too much introduction so that they could do all the thinking themselves. Before this lesson we had previously practised how to factorise different simple linear expressions (Using the worksheet here) so we had already seen and discussed some of the maths behind expanding and factorising expressions.
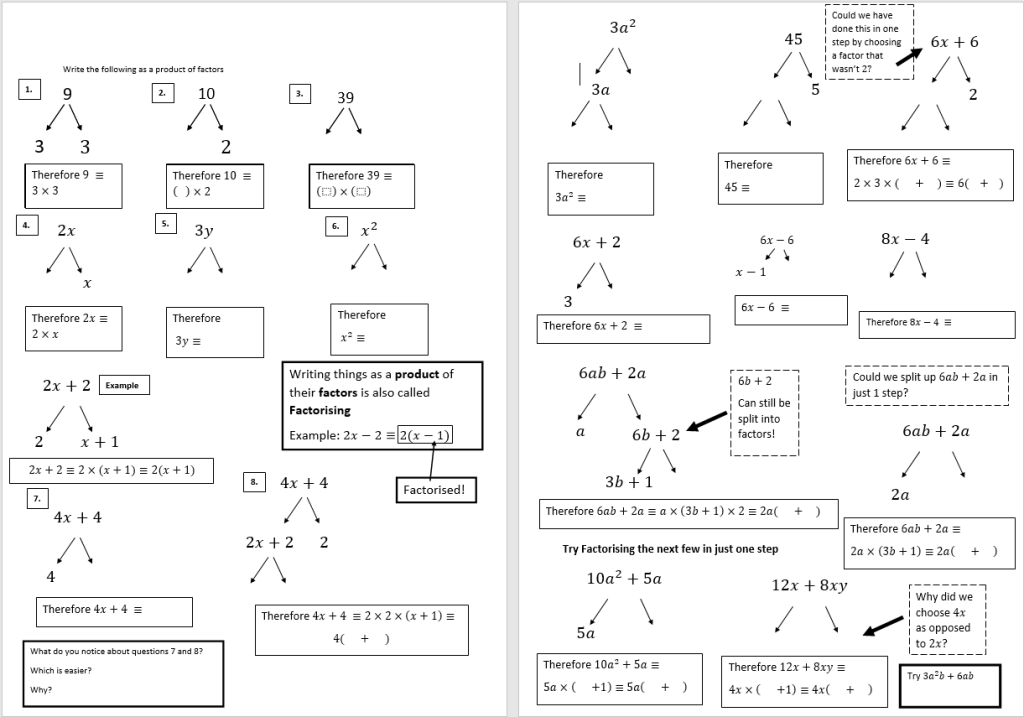
The Worksheet

(The worksheet is attached here – I encourage you to try it yourself before continuing!)

The purpose of the worksheet is for students to recognise that when they are factorising the parts they have inside and outside the bracket are the factors of the expression. Intuition that will help with many similar problems later in their mathematical careers.

Worksheet starts with an example and builds from there – fill in the blanks!

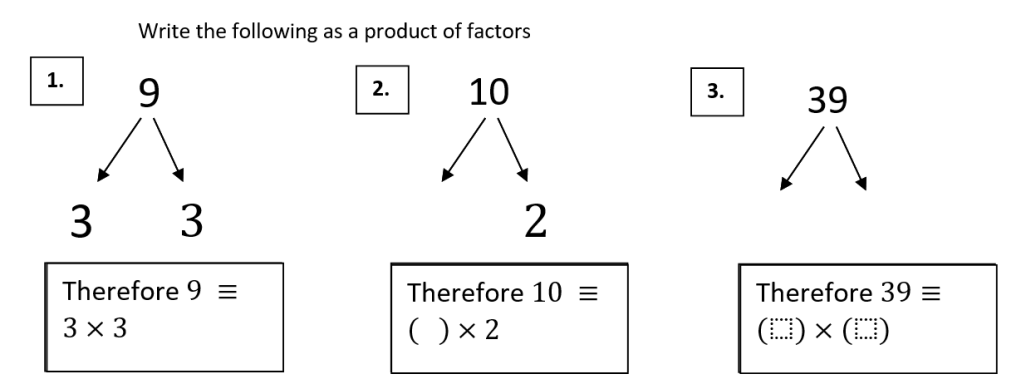
The sheet uses the idea of a “Slow Build” to get students to start from something they are comfortable with and slowly build to deeper questions

Moving onto using the same method for splitting expressions into factors

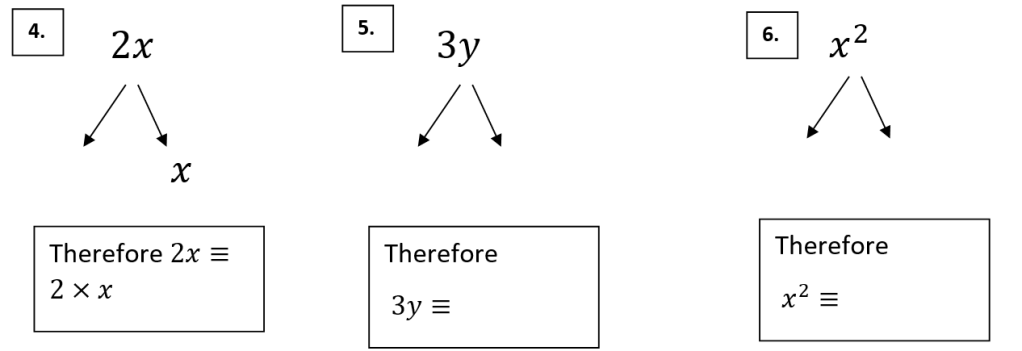
After quickly discussing questions 4 – 6 with the class they were then left to attempt the rest of the worksheet while I circulated to check on progress. The sheet contains various questions and hints that students are required to write an answer for which lead to some fantastic discussion throughout.

Example of hints and questions for encouraging deeper thought. In particular looking at the different ways you can start to split equivalent expressions.

The rest of the worksheet contains more practise including looking at harder examples eventually moving to expressions with multiple variables that they hadn’t seen before (Although in the context of this worksheet were answered quite successfully!)

Is x+3 a prime factor? Does it matter?

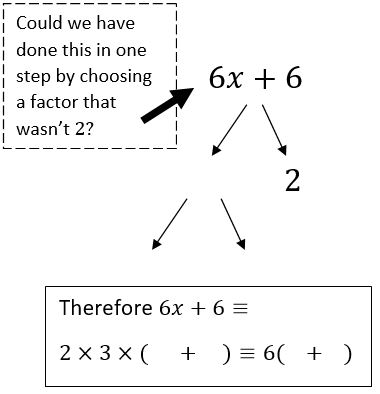
This Question on the left gets the students to ask if there is a more efficient way of answer the same question leading to a factor of 6 on the outside of the bracket later on. As a class we discussed the differences between prime factorisation and splitting things into their factors and also using brackets when writing something in its factorised form. This question on the left encapsulates lots of these thoughts at once.

Factor(is)ing

I am undecided as whether I like using the word Factorising when looking at products of factors or whether I prefer the more american Factoring. The (is) in Factorising feel slightly unnecessary and Factoring seems to convey just as simply that we are going to be looking into factors. Let me know which one you use!

Post Credits

Overall this worksheet created some very interesting discussion with my students and also led to increased fluency when dealing with factoring questions in later lessons. The idea that factors can also be algebraic expressions and not just integers was also a great source of conversation in the classroom during the lesson.

I have included an image of the whole worksheet below in case you are unable to view the download. Answers are available through the Resources page.

The whole worksheet – click it to download

Thanks for reading!

NJK

Categories
Maths for Teaching slow build

Vector and Equating Shenanigans

undefined

Part 1: The Question

This rather innocuous looking question came at the end of one of our GCSE mock exams and at first glance didn’t seem like it would cause to many problems. Part a is simple enough but part b was basically unlike any question I had seen at GCSE – definitely not a question I had adequately prepared my students for. The marksheme doesn’t even reveal the true glory of this question

Markscheme for part b – the P1 for complete process to equate coefficients is the most brutal 1 mark I have ever seen

Every attempt to explain this question to students led to whiteboards full of confusion. So with the help of some wonderful colleagues we created some resources to help actually teach the skills required to achieve these few marks.

Part 2: Equating Coefficients

Start of the equating worksheet given to students (Can be downloaded from link at bottom of page)

We couldn’t find any resources for teaching equating so we decided to create one ourselves. We created a worksheet using the principles of the “Slow Build” where students slowly work through examples starting from examples they have seen before and getting progressively more difficult. Also always a shout out to Craig Barton and VariationTheory who I have big time fan girled over ever since I sat next to him in a session at BCME 2018. It felt fun to use the idea of collecting like terms – something that the students were very comfortable with – to explore a much deeper method.

Students have slowly built up to these more difficult questions where they need to use simultaneous equations to solve them. The second question in the photo is actually the exact equating problem they would have needed to solve in the earlier Vector Question

Working in pairs the students were able to carefully work through all the questions with minimal input from me – drawing a few students to our glorious whiteboards when they were in need of a nudge.

Example of using equating to factorize quadratics

The use of examples they recognized helped with the transition to more tricky and interesting questions on cubics later on an fed in nicely to our work with cubics (details in a future blog post)

Once I felt confident that the students were comfortable with the ideas behind equating coefficients we moved on to the main event (in a different lesson)

Part 3: Getting to the problem

The question that started the next lesson

Working out that this problem was relevant to our initial question was such a wonderful aha moment for me. We were just playing around on some whiteboards wondering what the simplest form of the vectors question might look like – a classic problem solving technique that always brings me joy – when we settled on this. Although you can solve this with similar shapes as well as straight line graphs (I will leave those as an fun extension) the vector proof feels not only very elegant but also leads directly into its more harder variations. Below is how it was presented to the students after some discussion and attempts from them.

This is the beginning of the Slow Build Vectors worksheet that the students were given – made using the wonderful equation editor on Word

Once the students had attempted this question we worked through it together as a class making sure that there was a consensus of understanding they were then encouraged to work through the rest of the worksheet in pairs using the whiteboards around the room to play around with the questions.

Generalizing the previous problem to rectangles of any size

Eventually they had tackled a few simpler questions and they were faced with the same (albeit more structured) vectors question they had seen in their mock exam.

Adding in a twist before leading on to the main event

Part 4: The Main Event

The most brutal P1 mark I have ever seen

Seriously this was two marks or something. The students could have completely left this out and still done phenomenally well (as they did!) but the students have every right to want to understand everything that could possibly come up on their GCSEs and also maths is so cool and the JOURNEY. The JOURNEY. Such an absolutely joy. Big shout outs to the one student in the whole year group who got the marks as well as to some awesome colleagues for dealing with me pestering them about the question repeatedly over the course of a week.

Part 5: AOB

Whether a question like this will every actually come up again seems very doubtful, and whether my students would have thought to use these skills if it had come up is also doubtful but I think there is such a joy in deeply exploring one question and seeing all the other Maths that falls out.

Below are the links to the full worksheets – feel free to click, download and try them yourself!

If you are interested in seeing more Slow Build worksheets I am currently in the process of adding them to the Slow Build page on this website!

Bonus extension question sent to me by Woody L – show that p and q are both 6
Another bonus question that can be solved using equating (Show that c is 3 and d is 13)

NJK